
In the spring of this year, I started a weekly tips newsletter, Gareth's Tips, Tools, and Shop Tales. I had released a book of tips in 2018, called Tips and Tales from the Workshop, and couldn't shake the habit of tips-collecting. So, I decided to launch a newsletter to share what I was rounding up each week.
The newsletter has been a big success and I am thrilled with the response I've gotten. I decided it would be fun to go through the last seven months content and share ten of my favorite tips with Boing Boing readers. Here they are, in no particular order.

Details Layer
Scott of Essential Craftsman shared this pearl of wisdom on an episode about using construction string: "Details layer. The more accurate you can get in your details, even with something as mundane as how you tie your knot – it all accumulates to acceptable accuracy." This is a maker's truth. I've been thinking a lot about this lately because I am the king of cutting corners, lazy work habits, and fudging the details. So, I know exactly what he means. I think understanding and applying this concept is the difference between a master craftsperson and an amateur. As I work, I don't put tools back, I don't stop and sharpen or change blades when I should, I don't read instructions, I try and rush things, and I try and skip doing things the way I know they should be done. Details layer, and before you know it, I am frustrated and the project is way off square (whether literally or figuratively). This weekend, I tried to be ever-mindful of this truth and I could see a difference in my work. I think I'm going to make a "Details Layer" sticker and hang it in my shop.

Printing on Heat-Shrink Tubing
In this episode of Maker Update, Donald Bell covers a cool "hack" from Al Williams of Hack-A-Day on printing onto heat-shrink tubing using a Brother label maker. This opens up all sorts of opportunities for DIY branding, organizational labeling, and other applications. Good stuff.
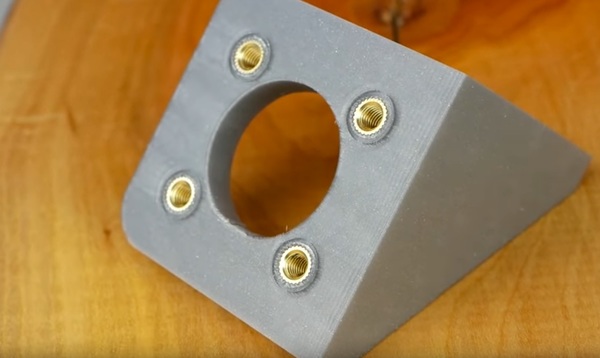
Threaded Inserts for 3D Prints
On CNC Kitchen, Stefan conducts a set of experiments to find out how much better threaded inserts are over 3D-printed threads that you build into a print. The conclusions: If your connection is going to receive a lot of stress and/or disconnecting/connecting, inserts are the way to go. If not, you can probably get by with threads designed into your prints. The other advantage of inserts? The satisfying act of sinking them into the print by heating them with a soldering iron until the plastic melts.
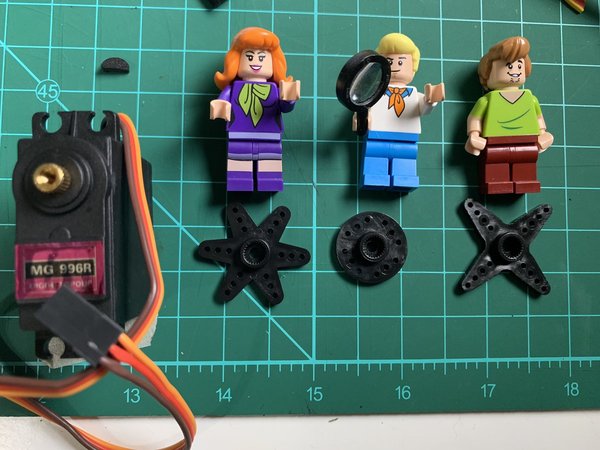
Understanding Servo Horns
On Amie DD's Twitter channel, she asked her followers to give her some insight into the different servo horns that usually come with a servomotor and what they're specifically used for. The collective wisdom:
The Daphne Horn: Multi-purpose horn that combines the best of disk and arm-type horns. Can serve either rotational or linear actuation functions. One commenter noted that a Daphne is what you reach for when you don't have a Fred or a Shaggy.
The Fred Horn: Used for continuous rotation or when the connection will be under significant stress.
The Shaggy Horn: This one was originally develop for R/C airplane control and is used for controlling ailerons because it pulls in on two sides allowing for one side to go up and one to go down at same time by same degree at the same time.
The multiple holes adjust the total throw of the movement so you can set upper and lower limits. Can be used for any linear control applications. And, of course, there's another wonderful tip in here, Amie's use of Scooby Doo Lego minifigs to ID the three horn types. More of this, please!

Paint Dries Half a Shade Darker
Adam Savage: "You have to remember that colors often dry half a shade darker than they are when they're wet." Making this mental calculation while choosing, mixing, and applying paint is very important in getting the final colors you desire. Another painting tip: Don't try and lighten a dark color by adding white or a lighter color to it. Add the darker color to the lighter color and bring that up to the shade you're after.

Quick n' Easy Rotary Bits Holder
This is one of the coolest quick-builds I've seen in a while. Keith of Keith's Test Garage created three bits organizers for his rotary tools and router bits using dado cuts to create inter-sectional slots to hold tools with 1/8', ¼', and ½" shanks. He got up to 384 1/8" spaces (for rotary bits) after only minutes of cutting dados on a table saw. Genius!

Testing Formulations for "Retrobrite"
I wrote about using Retrobrite in my "50 Top Maker Tips" piece in HackSpace Issue 20. In this video, The 8-Bit Guy runs through a number of different formulations (beyond the common hydrogen peroxide, laundry booster, and UV light). The surprises here are ozone and UV light and hydrogen peroxide and heat. For retrobriting large objects, pumping in ozone and sunlight looks like the way to go.

Reviving Dead Markers
Did you know that you can easily bring a dead, alcohol-based marker (e.g., Sharpie, Magic Marker) back to life simply by removing the nib from the marker (however you get inside your particular pen) and depositing a few drops of isopropyl alcohol onto the felt material? It is usually the solvent the ink is mixed with that dries out before the pigment does.

How to Use a "Tick Stick"
Leah from See Jane Drill often shares eye-opening and extremely useful ideas. In this video, she shows how to use something called a "tick stick" to copy and transfer an unusual shape. Watching the video, at first, I had no idea where she was going with this, but I had a real "ah-ha" when she started reproducing the shape.
The Universe is a Collection of Parts
I met an inventor once, named Perry Kaye. He had a brilliant approach to prototyping his designs. He didn't try to reinvent the wheel–he used existing wheels from something else! He called this approach "Frankenstein prototyping." When Perry came up with a new idea, rather than going the conventional route of drawing up plans and paying a rapid prototyping service or someone else to fabricate it, he'd just head to Home Depot, Toys "R" Us, and the local hardware store. He'd find the parts he needed on existing products (a handle here, a type of blade there, this motor, that gearbox). Then, he'd cut up these existing products and stitch them together into his new monster creation.
This is an incredibly powerful perceptual shift— to see the physical world around you as a collection of parts that are currently in one configuration, but are just waiting to be taken apart and recombined into something new. Especially with today's 3D printers and cutters, high-performance adhesives and other materials, and so many cheap components readily available online.
Besides saving time and money, there's an added benefit. When you've spent so much prototyping an idea, you become literally invested in making it work, even if it doesn't. But when you've only invested an afternoon and a few bucks on a Frankenstein prototype, you're more likely to salvage whichever parts you can, and move on to the next idea. This method of rendering your ideas allows you to iterate quickly and gets you to a smarter, more viable design that much faster.
Of course, you don't need to be an inventor in the classic sense to benefit from this way of looking at the world. You can make one-off creations with this method, or solve vexing design problems on existing projects. We have this perceptual blindness where we tend to see things as they are rather than the potential for what else they can become. Frankenstein prototyping is a way of training oneself to see that potential.
***
Bonus Tip! This just in from my most recent newsletter:

Using a Washer as a Depth Gauge
My pal Andrew Lewis writes on Twitter: "If you are reaming out a panel hole for a switch or indicator light, use the washer from the switch as a stop on the reamer, so you don't open the hole too far."


