
Measuring Tools
Experienced builders have finely honed estimation skills, but a single bad measurement is still one of the quickest ways to ruin a project, or at least a part of one. As my uncle would say, "I cut it twice and it's still too short."
A big part of measuring things well is using the right tool for the job. Length, depth, angle, weight, level, diameter and circumference all have different tools designed to get it right. The precision of the measuring tool is also important. That is, how sloppy will the measurement be? The length of floor joists can safely vary by a quarter inch, but a hundredth of an inch variance will ruin the threads on a small bolt.
And finally consider whether you need an absolute or relative measurement. Rulers measure absolute length. Inches, millimeters, furlongs, etc. But framing squares are relative, in that they only show how close to 90º an angle is, not the angle itself. If you need to know the degrees (or radians) use a protractor.
While you rarely need to spend a lot for a measuring tool, spending a few extra dollars can pay off. Cheap measuring equipment can be surprisingly inaccurate. If you do choose the cheapest model check its accuracy against a verified source before trusting what it tells you.
It's also important to treat them with care. Some are more durable than others, but dents, dings, and dirt will harm the accuracy of even the hardiest device.
Here are some of the most common and useful measuring devices to keep around a workbench:

Ruler
Scientists and engineers call a straight edge with graduated markings a "scale", but everyone else calls them a ruler. They were one of the very first measuring tools, used to standardize the size of various body parts, which had done the job for millennia.
The markings should match the result you want. Don't use a metric ruler if you want inches, don't use a ruler with only 1/4" markings if you want 1/32" accuracy. Metal rulers tend to be more precise than plastic or wood simply because of the manufacturing methods. Metal rulers also make better straight edges since they're more durable. Using a plastic or wood ruler as a cutting straight edge is a good way to ruin it as both a ruler and a straight edge.
Don't measure from the very end of a ruler because it can be damaged or the markings could be simply misaligned from the stick. Good rulers have their zero point a bit from the end to account for this. If the zero on your ruler is at the very end, start measuring from the 1" (or 1cm) mark (and be sure to subtract 1 from your measurements to compensate). This will counteract any inaccuracies with the zero point.
Center-finding rulers put the zero in the middle and count up in both directions. To find the center of something, move the ruler until both sides have the same measurement and the center will be at zero.
Try to use a ruler that is at least as long as what you're measuring. (Or use something longer, like a measuring tape.) Inaccuracy adds up quickly if you have to move the ruler while measuring.
Pros:
Cheap and plentiful. Available in many sizes, materials, and measuring units. Can double as a straight edge.
Cons:
Bad a measuring distances more than a yard. Precision not better than 1/16" or 1.5mm.
Use for:
Everyday measuring of person-scale objects.

Tape measure
One of the most common tools in a tool box, it's more than a ruler that rolls up and clips to your belt. When extended the metal tape becomes rigid which makes it possible to push along floors and up walls, measuring things out of reach. Wider tape measures are most stable when extended and better at reaching long distances.
The little tab at the end of the tape measure should move slightly. It's not broken, it's a feature to keep measurements accurate. When measuring an outside dimensions it will slide out to compensate for the thickness of the tab. When measuring the inside dimensions it slides back to keep the measurement from being long by the thickness of the tab. What this means is that you don't have to account for the width of the tab when measuring.
However the tab can also bend, which will make every measurement wrong. Calibrate your tape by measuring a block of wood (or table, etc.) starting at the 1" (or 1cm) mark, and again by hooking the tab over the end. Bend the tab until the measurements agree. (Minus the extra inch or centimeter.)
Tape measures are most popularly used in construction. Houses in the US are built using imperial measurements, so tape measures typically have markings at 16" and 19.2" — usually red and black diamonds, respectively — indicating the most common spacings for studs.
Laser and sonic tape measures make certain kinds of measurements quickly but are both more expensive and less versatile than physical tape measures. Don't bother with them unless you have a specific need.
Pros:
Compact while still good at measuring room-scale distances. One person can accurately measure distances bigger than they are.
Cons:
Bendy. (But this can also be a feature.) Not good for small or very precise measurements.
Use for:
Measuring things bigger than a foot but smaller than a house.
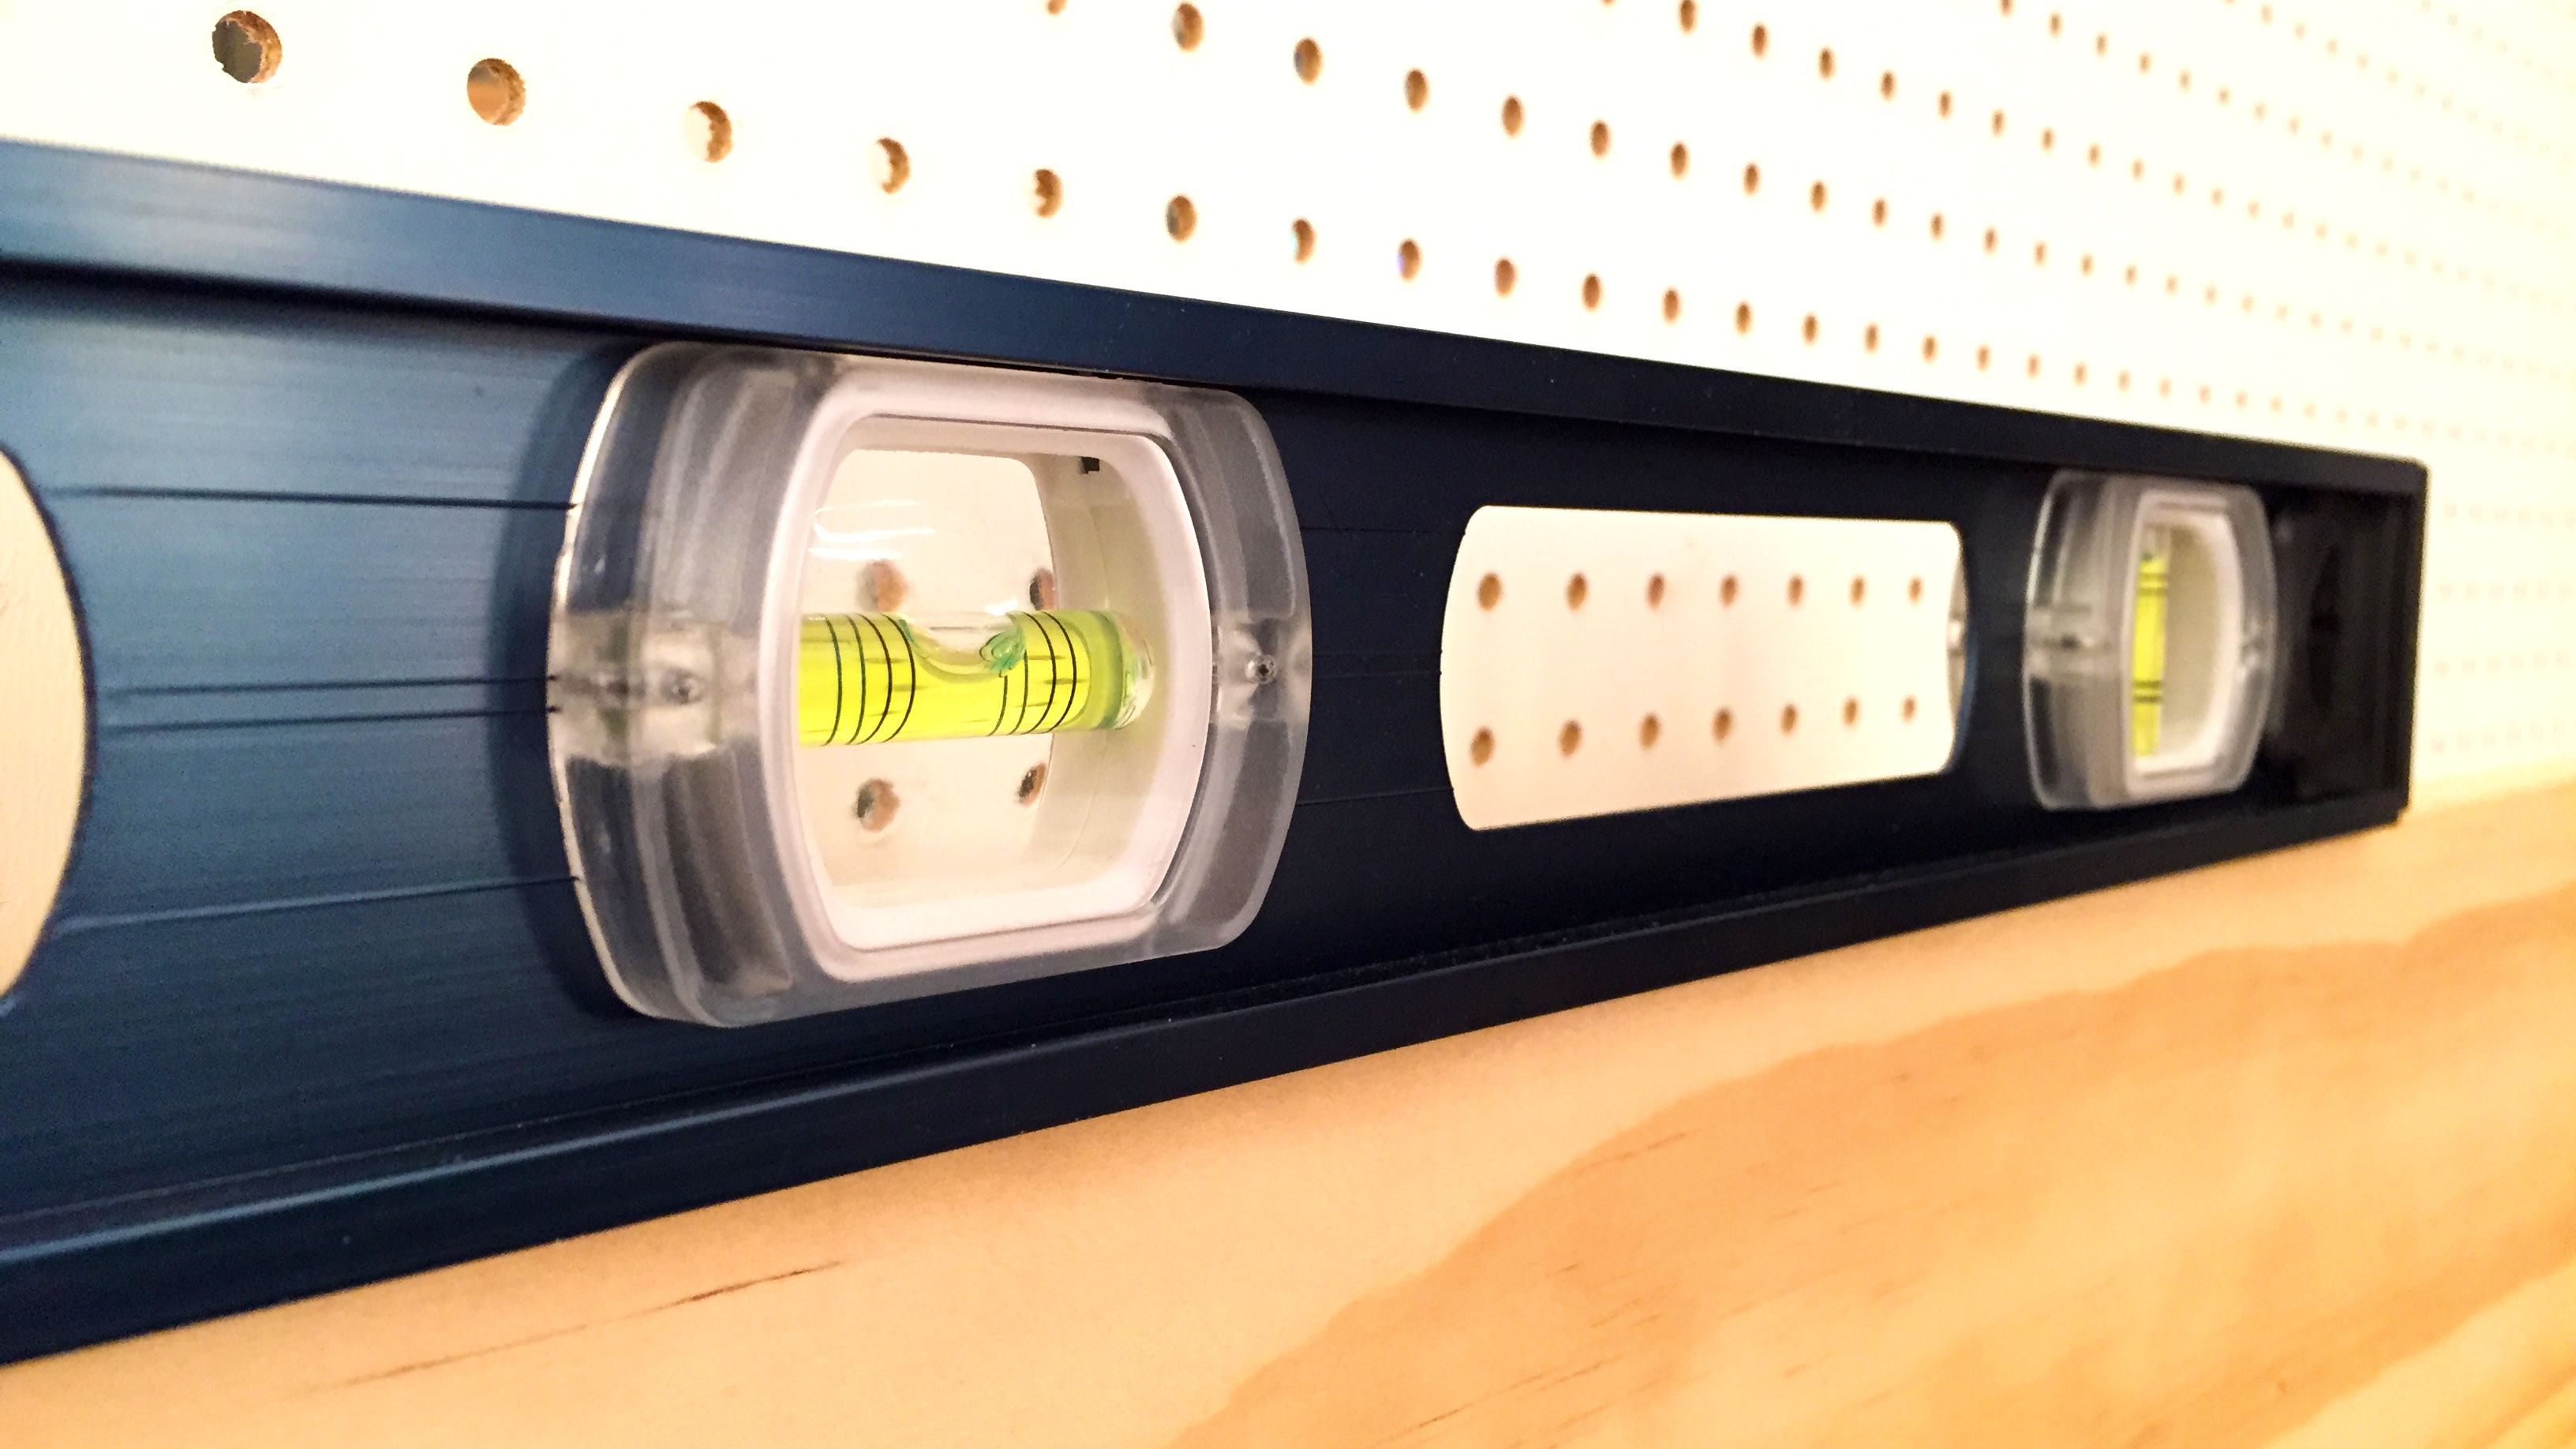
Level
Sprit or bubble levels don't measure specific units like a ruler, they compare the orientation of an object to the pull of gravity.
Levels have two parts: The frame has broad, precisely machined flat edges. Into the frame are set transparent tubes filled with dyed alcohol and a small bit of air. When the tube is exactly perpendicular to gravity the air bubble will float in the exact center of the tube, marked with a pair of fine lines.
Typically levels have at least two bubble tubes, aligned at 90º to the other, making it easy to gauge horizontal and vertical. Some models have tubes set at 45º or other convenient angles. Using one is as simple as laying it across what you need to level and wait for the bubble to stop moving. If the bubble is offset to the left, adjust your work clockwise until the bubble is centered. To the right, the make adjustments counterclockwise. Make sure the surface and the level are both clean and free of debris or you'll get bad results.
They're available in lengths from 2 inches to 8 feet. Longer usually means more accurate, but it's also more expensive and it might not fit where you need it. If you need to gauge level over a long distance (say the width of a driveway) drive a stake on each side, tie a taut string between them, and measure the levelness of the string, adjusting the string or stakes as necessary.
Be careful handling levels. The flat sides are precisely machined and small dings, dents, twists or bends will ruin them, and the transparent tubes can be crushed. If you suspect your level is giving a bad reading rotate it 180º (in any direction) and measure again. A properly calibrated level will give the same measurement both ways. Quality levels have screws near the spirit tubes that can be adjusted to fine tune the angle of the tube.
Pros:
Easy to use. If kept in good repair they are very accurate and last forever.
Cons:
Doesn't give an absolute measure of angles. (Though there are combination protractor/levels that do). More fragile than many other construction tools.
Use for: Small ones are handy for leveling paintings. Longer ones for installing doors, windows, cabinets, and countertops. Also handy for landscaping and pouring concrete so you can tell which direction water will drain.

Fractional Caliper
Fractional calipers are for getting very precise measurements of smallish objects. They are three tools in one. The side that looks like a wrench measures outside dimensions. On the opposite side are smaller flanges to measure inside dimensions, and the far end has probe to measure depth. They vary in price and capability from several dollars up to several hundred. Accuracy and price are usually pretty tightly correlated, though you can get a decent one for less than $30.
Simple models have a little window to indicate the measurement, but for precise measurements use one with a dial or a digital readout. Digital calipers are generally cheaper than dial models, while having at least as much precision. Digital models are also switchable between imperial and metric units. Both types have a small knurled knob to move the scale around. Rolling a thumb across the wheel to the right opens it, to the left closes it. (Unless you use a rare left-handed model.) For the most accurate measurements make sure everything is clean, then tighten the calipers around (or into, or inside of, depending on what you're measuring) your object, and check that the caliper is aligned with the object. Twisting the calipers during measurement will hurt accuracy.
Like other precision devices they can wander due to variations in temperature and humidity, so they need to be zeroed out every time you use them. Close them fully and press the "zero" button (on digital calipers) or adjust the scale until the needle is at 0 (for dial calipers). Zeroing can also be used to calculate the difference between two measurements. Zero the calipers at the first measurement and the second measurement will show the difference.
Pros:
Precision measuring (better than 0.001" or 0.02mm) at for hand-sized objects. Fast and accurate.
Cons:
Most can only measure 6" (15 cm) or less. Somewhat delicate and susceptible to dust and mishandling. Digital models are near worthless if the battery runs out.
Use for:
Measuring small things with high precision. For better precision of even smaller things, use a micrometer.

Square
It has many names: Combination square, T-square, roofing square, set square, try square, carpenter's square, and more. But whatever the name they're all the same idea. Two straight edges joined right angels to help keep things at 90º. Good ones are made of metal and double as a ruler and a straight edge. Plastic squares exchange accuracy and durability for price.
Like a spirit level they're a relative measuring device, showing only if an angle is 90º. If you want the actual angles you'll need a protractor. (Or a square with a protractor attached.)
They typically have one leg longer than the other, and longer the legs the more accurate they are. For the best measurements, rotate it so the long leg aligns with the long measurement, and press it firmly against the known good edge. (For example the long edge of a piece of lumber, or a plumbed wall.)
Squares that aren't, in fact, square can cause endless aggravation. To check for true tape a piece of paper to something with a flat side, like a table. Align the square along the flat side and draw a perpendicular line along the other edge of the square. Flip the square over and repeat the process, trying match the first line. If the lines diverge your square is out of true. Some squares have adjustment screws to put them true, others can be adjusted with careful percussive maintenance, but if it's too far out of true it's better to discard it and get a better one.
Pros:
Simple tool for keeping things square.
Cons:
Most don't do anything but measuring squareness.
Use for:
Anything that needs right angles.

Divider
Dividers and calipers (not to be confused with fractional calipers) are another relative measurement device. They are made to transfer measurements from one place to another. For example transferring size to a ruler where a ruler is impractical, or directly to another piece of material when making a copy of an original. They consist of two arms that can be adjusted either by friction or by turning a thumb screw. (The latter is more accurate.)
Dividers have two sharp points and are used to transfer measurements or mark off distance. For example they can be used on a map to estimate distances by setting it to the map scale mile (or kilometer, etc.), then tracing a path, alternately pivoting on each point. This is commonly seen in period seafaring movies when ship captains plot their course, but can be used for any kind of successive measurement, like laying out button holes or spacing rivets.
Calipers come in two common varieties: The arms of an outside caliper bow outward to give clearance when measuring the outside diameter or thickness of something. An inside caliper has arms that bow inward giving them clearance to measure internal diameters. Once you have the caliper sized, you can use a traditional ruler to measure the distance between the points.
Pros:
Fast way to transfer dimensions, especially on weirdly shaped objects.
Cons:
Don't give absolute measurements. Transferring measurements from a divider to a ruler (And vice versa) is error prone.
Use for:
Measuring diameter and transferring measurements. When you need to make two (or more) things identical but don't care about absolute measurements, for example shaping matching bolsters a stairway.

Protractor
When you need to measure an exact angle you need a protractor. They range from stamped pieces of clear plastic to large digital models with mounted lasers, but they all do the same thing: Measure angles. The center or pivot point is placed at the vertex of the angle, and the zero of the scale is aligned with a straight edge of the material. The reading where the other edge of the material passes across the scale is the angle.
To check the accuracy of a protractor (or the accuracy of the person using it) use a straight edge to draw an arbitrary triangle, then measure the inside angles of the three corners. If everything is accurate the sum of the angles will equal 180º.
They can sometimes be found attached to levels, squares, and calipers, or vice versa.
Pros:
About the only good tool for measuring arbitrary angles.
Cons:
Can take practice to use accurately.
Use for:
Whenever you need to measure or mark an arbitrary angle.


